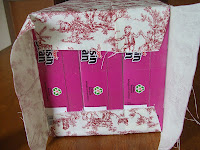
 I began with three cereal boxes. I taped them together with clear packing tape and cut the sides at an angle from the back down to the front, about 6" from the base. I didn't cut the front piece of the front box off at the 6" line, instead I scored it and folded it to the inside for added strength. I did the same for each joining of the boxes--I cut the back piece off to the height I wanted and scored and folded the front piece over the back piece and glued it to the inside. I used Tacky glue for this step. On the back piece, I folded the flap of the cereal box to the inside and glued it down for extra support across the back.
I sprayed the outside sides with spray adhesive because I feel like it holds fabric more smoothly without seeping through between the threads than Tacky glue and glue guns leave ridges underneath which I didn't want. I laid the fabric out on the table wrong side up and placed the stack of boxes on the back side about 2" from the bottom selvage edge.This is important for a one way design like this. If the fabric didn't have a specific direction, I could have covered it more like wrapping a gift. I chose an upholstery weight toile fabric, about 1/3 yard that I had in my fabric stash left over from previous projects. If the fabric had been lighter weight, I would have sprayed the outsides of the boxes with a coat of light spray paint to cover the printing, but the heavier fabric covers the print on the boxes well. I decided to place the seam on the side so it would be less obvious than down the center of the back or front. Wrap the fabric around the boxes, leaving about 1 1/2" overlap. Using Beacon Adhesive's Fabri-Fix, I turned under about 1/2" of the overlapping edge and glued it down over the bottom piece of fabric.
I cut the bottom overhang at an angle from the inside to the corner on the two sides and glued them down, keeping the fabric nice and smooth. Then I folded the other two sides in at an angle and glued them over the top. On the sides, I snipped the fabric straight in at the point where the boxes are joined, then cut each section at an angle to fit in place smoothly. The front and back were easy. I just cut from the outside edge to the corner, turned under the edges to make a slight angle and glued them down inside the box. I didn't cover the bottom of the box after turning in the ends, but if it bothers you, you can cover it with a piece of fabric or felt.

I now have a no (new) cost organizer for my desk to keep my loose papers organized that is also attractive. Win-win as far as I'm concerned.


No comments:
Post a Comment