Tuesday, September 19, 2017

Dragon Eye Journal/Box

Recently, I learned how to make glass "dragon eyes". What do you do with a handful of dragon eyes? I decided to make a spell book box. It looks like an ancient leather bound book on the outside, but it's really a box.

I must give credit to the talented Yvonne Williams of Back to Earth Creations for her excellent tutorials on making the eyes. https://www.youtube.com/watch?v=TsSaE9g1Y1w
There are other tutorials available on you tube by other artists, but hers was the best for me.

 The outside is covered in paper which I distressed to resemble old worn leather, and the the interior is a chipboard box I made and covered in old style paper to coordinate with the outer cover. 

Here are some other views of the box.


Saturday, May 6, 2017

Write It On Your Heart Canvas

Life is too short to waste time doing things that don't bring us happiness, but what really gives life meaning is the relationships we have with those we love. I think first of family, but we have friends we love like family, too.

This canvas is created using an 8" square museum canvas (1 1/4" deep) turned upside down and distressed using modeling paste, inks, and paints. Inside, I've used card stock, corrugated paper, embossed chipboard, twine, cheesecloth, and a resin heart artifact by Prima Marketing. Layers of  paint, ink, and metallic paste provide a rich surface reflecting multiple colors.  


Write it on your heart that the ones you love are life's most precious gifts. Always be thankful for the blessings of loved ones!

Friday, April 28, 2017

Birds, Birds, Birds

I felt inspired this month to practice some new techniques using birds as my subject. I've always loved birds (as long as they're outside), especially songbirds. I also drew some inspiration from the scriptures, Matthew 10:29,30 (KJV) and the song, "His Eye Is On the Sparrow." Lauryn Hill has a killer version of it, by the way, that's really worth listening to and having a copy. Enjoy!

 This is an 8"x 8" canvas board. It is a mixed media piece. Materials are acrylic paints, modeling paste, paper, gilder's paste, and Faber-Castell Gelatos (a water soluble pigment stick that is similar to an oil pastel). I've stenciled, stamped, painted and smudged...
 This is also a mixed media piece done on an
 8"x 8" canvas board. The material are the same as above, with one addition, a strip of crocheted lace.
This is a 9"x 12" studio canvas. Materials are the same as above with the addition of some glass glitter and micro beads.

Monday, April 3, 2017

Captured Faerie

    This poor little fairy is locked in a birdcage, but still has the tender heart to care for a tiny bird. It appears that she's fallen out of the peddler's cart and landed on the forest floor carpeted with autumn leaves. The cage is the alterable medium birdcage from Prima Marketing. She is set in a 12" x 12" gallery profile canvas from Blick Art Supplies that has been turned backwards and used with the canvas as the back and the frame as a shadowbox. The canvas has been lifted from the frame around the edges and distressed. The fairy is modeled from polymer clay, painted, and clothed in Sari silk and gauze.
She is surrounded by fallen leaves and an assortment of other items that have fallen to the ground around her, a spoon, a small bottle labeled as lavender, but is really filled with pixie dust, and a few other small objects. She has her little bird friends to keep her company until she is rescued--which will be soon, undoubtedly


I tapped some crystal head upholstery tacks around the outside edge of the frame just for a little added pizazz.


This idea was inspired by an altered birdcage done by Robbie Herring on "Live With Prima".

Sunday, March 26, 2017

Memories


     This week I decided to use one of my own family pictures to create a canvas. I used a little different process, in that I left the canvas white and immediately began adding components and layering with inks and paints. Usually I color the canvas first and then add more as I go along. This was a fun way to venture out of my normal habits and try a new technique. When using vintage and one of a kind photos, please save the originals in a nice album. Make a copy and use the print instead. This way you can enjoy your family photos to decorate your home, but still preserve the originals to be passed down to future generations. I just use a good quality card stock and a standard HP ink jet home printer, but you can have them printed at a print shop or office supply, if you desire. With the ink jet prints, I always spray with an acrylic matte sealer before using. This keeps the ink from running or fading when it comes in contact with glues, inks or other mediums. There's usually a lot of water in the mediums I use, and this technique has worked very well. I also have found that in humid climates or environments (bathroom, kitchen) prints can lose their color by absorbing moisture from the air. The sealer helps prevent that and also adds a nice, non-glossy finish to the photo.


I love the details and appearance of nostalgia that the multimedia process achieves. 

Saturday, March 11, 2017

Beautiful Moments Layout

Ever since I was first introduced to scrap-booking years ago I have loved it. Somehow, combining my favorite photos along with commentary (journaling) and creative elements really struck a chord. It's nice to have perfect albums with all the family photos carefully mounted and preserved in orderly fashion with names and dates carefully lettered under each one, but I love the personality of a scrap-booked album. Not only am I able to tell much more of the story behind the pictures, but I get to be creative in decorating each page according to the personality of those in the pictures. Sometimes, I just express myself and don't worry about whether my work reflects the likes of those in the photo. Now that so much digital storage is available, I don't always print out my photos and put them into books. A concept that I've embraced more recently is to create a scrap-book layout, but mount it to heavy chipboard and display it instead of binding it into a book. This one combines my love of multi-media with some scrap-booking concepts.


Friday, March 10, 2017

Penny Farthing Fun

Another project wrapped up, I think. I haven't decided if I'm really done with it yet. I think I am. This is a really fun project with a metal piece from Prima Marketing. The large wheel can be a frame or shadowbox. I made a steampunk type composition inside and mounted it to the inside front of the frame, leaving lots of room behind it to be a secret stash spot. It would be great to put a mini picture album in there, or the extra set of car keys, or maybe your chocolate stash...


I do need to put a pretty paper inside here. I'm on it!


See you soon!


                                                      This is better.

Thursday, March 9, 2017

Heart With Wings

Happy Friday. Working on several projects at the same time creates the problem of lapses between shares. I've had a picture in the back of my mind for a while of how to use the resin heart I purchased from Prima Marketing. It is one of their Archival Cast pieces which I've had for at least a year. I finally decided to mount it on a canvas with angel wings. I designed the wings, then cut them from heavy chipboard. After a couple layers of gesso, I applied some thick homemade modeling paste with a palette knife to create the appearance of feathers. A thorough dry and then a layer of black gesso followed with a layer of crackle medium and a thin coat of white acrylic paint created the aged plaster effect.
Here are some closeups!


Thursday, March 2, 2017

Believe in Magic

I wanted something with more gold tones than I normally use and I may have gone a little overboard. I seem to always end up with lots of blues and greens. Teal, turquoise, forest...it doesn't matter what shade, I seem to gravitate towards the cool color spectrum all the time. Odd, since I prefer warm colors for my clothes and home decor.
I repurposed a canvas for this project. That's one great thing about mixed media, the more layering and textures you have, the better. Also, it allows me to change up my decor without investing lots of dollars, just my time.

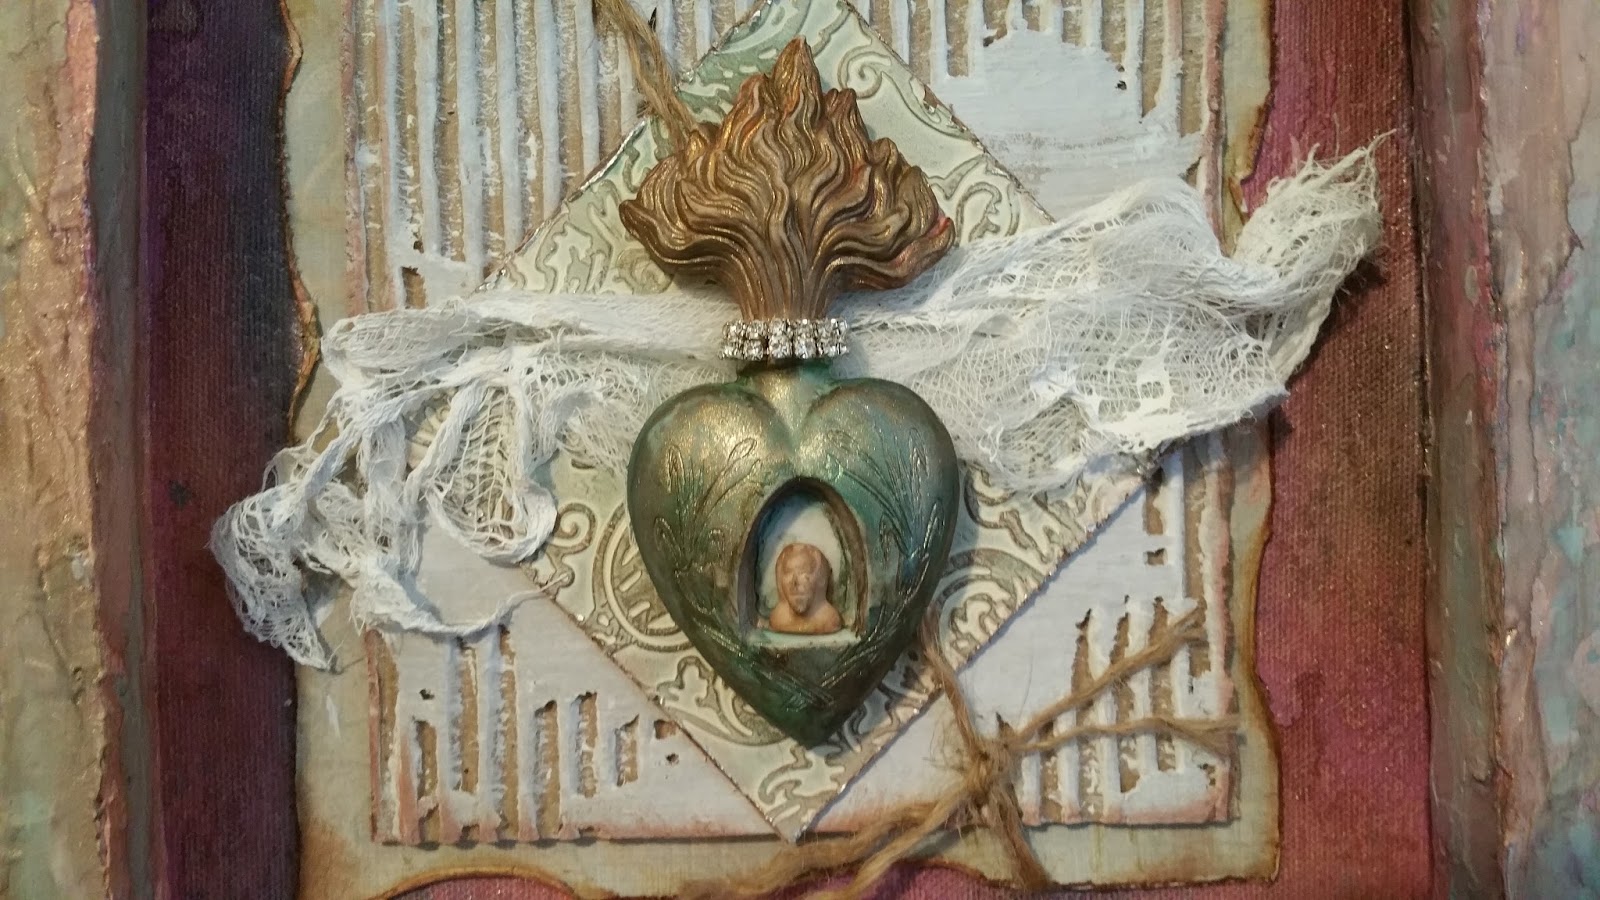
There are lots of elements here: printed tissue paper in the background, resin pieces, papers, mulberry paper flowers, metal bits, micro beads, pearls, and loads of bling. This was all layered on modeling paste stenciled designs and I also used some honeycomb packing paper to add additional texture and dimension to the background.

 I love incorporating vintage photos and artwork into my designs, but because I didn't permanently fix the photo into the frame, it could actually be removed and a current personal photo displayed in the frame instead.

More details can be seen in these photos.


Monday, February 27, 2017

Hearts

This is my version of the project done by Angela Holt (https://www.youtube.com/watch?v=69-68DvwtB0&t=1623s). Hers is much bigger, so has more elements.

 It's so much fun to play with a variety of inks and materials.

The embroidery hoop is 10 inches in diameter and covered in a lightweight canvas, then painted with a thick coat of white gesso.

The heart is half of a paper mache heart ornament that was glued onto the canvas. There are resin elements, metal, shells, beads and mulberry paper flowers layered with some stenciled designs and some lace and paper to add texture. Layers of paint, inks and gesso create the colors.

Thank you Angela for sharing your talent and this beautiful idea.

Sunday, February 19, 2017

Steampunk Dream

New project I've finally completed. I've been thinking about this for weeks and finally pulled it together. The canvas is the backdrop for the three dimensional steampunk hot air balloon. It took some time to figure it all out, but the canvas balances on it's feet, so it doesn't need to be propped to sit on a shelf or table.

 There are so many elements here, I can't go into them all, but the balloon is fabricated from a paper mache egg as is the teacup. There is paint, paper, burlap, lace, loads of metal gears, crystals, ink, and glitter. I turned a 12" square canvas around, removed the staple holding the canvas to the frame and then used that as a shallow shadow box to frame the project.
 Here are some other pictures:
 These allow a better look at the details.


This project was a lot of work, but also a lot of fun.

Vintage Girl with Hoop Canvas

I've been incognito for a long time, dealing with some health problems that are finally slowly being resolved. This is my first creative project in a long time. We moved and my paints and things were all packed up and I just didn't have the strength to do any organizing or unpacking. Now I'm more organized and really feeling more creative, so I'm off to the creating races!
                                          Here is the whole canvas, and below are closeups.


This is an 8" x 10" canvas I painted with white gesso, applied some clear modeling paste from different stencils, then layered with ink sprays, stamps, lace bits and paper to add more texture and color.

Once the background was done, I added a photo to a Prima Marketing resin frame that I'd antiqued with a bit of gold, copper, and blue-green patina. I layered the frame over a faux tin tile and piece of window screening. Fabric and paper flowers, bits of lace, a few resin and metal pieces were arranged around the frame. the finishing touches are some Prima glass pearls, crystal embellishments and floral wire "springs" dyed to match the background.

The photo came from Angela Holt's Pinterest pages. https://www.pinterest.com/angelahdesigns/?eq=Angela%20Holt&etslf=21077