

Thursday, June 21, 2012
My Patriotic Mantle is finally coming together!
I Love Stars!

Anyway, using my new pattern, I cut 5 points from my cereal boxes, folding along the fold lines and gluing where indicated in the instructions, turning the printed side to the inside. I used strips of masking tape to hold them in place while the glue dried. I also used it to reinforce the joints and seams after the glue was dry. I planned to cover the star anyway, so the tape was not going to show. When the glue had dried, I covered the outside with a layer of vinyl spackling. An easy shortcut here, is to mix some regular acrylic craft paint into the spackling before it is applied. This cuts out the painting step. After the star dried, I antiqued it with a dark brown glaze and wiped off the excess. A coat of sealer and it was done. I just wrapped a strip of patriotic fabric tied a bow, but I am already planning to replace it with different ribbon and embellishments for other seasons, so I can use it year-round.
 |
| Cardboard form. |
The other upside is that is didn't cost anything, because I already had all the supplies on hand...overall, it's a winner!
 |
| Covered with spackling. |
Saturday, June 16, 2012
One more patriotic banner!

I have my own collection of vintage postcards but some great sources for free are:
http://www.graphicsfairy.blogspot.com/
http://www.vintageimages.org/index.php/
http://antiqueimages.blogspot.com/
http://alteredartifacts.blogspot.com/
Some sites that have great images for a reasonable price are:
http://www.thevintageworkshop.com/store/
http://www.etsy.com/shop/AlteredArtifacts?ref=em
Most of these sites also have great ideas for using these images, too. Take a few minutes and browse...
Here are close-ups of each panel (left click to enlarge):


Thursday, June 14, 2012
Let Freedom Ring!

 |
| Whole door view. |
Saturday, June 9, 2012
Patriotic 2 x 4 Fun


Monday, June 4, 2012
Cinnamon Roll Waffles? Yummmm.

So I came across this amazing concept--making cinnamon rolls in a Belgian Waffler...hmmm. I have a Belgian Waffler in my cupboard that I use somewhat often, but only to make waffles. This really sounded like fun; waffles made from cinnamon rolls. Not to mention, it sounds tasty! Everyone in my family loves cinnamon rolls, but I don't make them that often. A perfect family night, game night, or movie night treat, I was thinking.
So in the name of pure (kitchen) science, I decided to try this out and see if it really was as easy and awesome as "rumor" has it. Well, guess what? IT IS!
So how do you do it? Easy peasy. Grab a tube (or three) of canned cinnamon rolls. Since I am a "from scratch" cook, I had to wait and buy these; I didn't have them just hanging in the fridge. I bought the Kroger brand of cinnamon rolls with cream cheese frosting. They have them with regular frosting, too, if you're not a cream cheese fan. If you're a "name brand only shopper," they will work too.
1) Heat up your Belgian waffle maker.
2) Open your tube of cinnamon rolls and separate four of them.
3) Place one roll in each section of the waffle iron and close it up.

4) When the waffle iron's "done" light comes on, open it up and lift them out.

5) Lay them out on a tray and drizzle with the frosting. If you like the frosting to melt and fill up the "cups" in the waffles, do this while they are still warm (not hot--it will melt right off if you put it on them right off the iron). If you like the drizzled look, wait for them to cool before you drizzle the frosting over the top. I did some of each type, you should be able to see the difference in the picture.
6) Enjoy!
I whipped up three cans for our family. It took me about 30 minutes, start to finish. If your family is smaller, you won't need as many and you can be done quicker. We really liked the extra crispness of the cinnamon rolls baked in the waffler. (Well all but one of us loved the crispiness. One preferred the softness of regular cinnamon rolls. No problem--more for the rest of us!) The house smelled wonderful and you don't have to heat the house up with the oven or waste all that extra electricity. Win-win-win.
Thanks to Henrietta at "A Hen's Nest" for this great idea. http://ahensnest.com/2011/09/waffled-cinnamon-rolls-recipe.html
Sunday, June 3, 2012
Good fences make good neighbors....

As far as cows go, I'm not really too interested (aside from the occasional steak, that is). I don't have cow decor in my home or car. I don't moo at cows when I drive past. And here in Texas, I drive past a lot of cattle!
They are just there. They generally aren't too bright or fun to watch. They are just there.
However, last night as I was dropping my kids off at an "End of the School Year" swim party at a friend's ranch, I noticed this prime specimen in their pasture. What a great looking beast! He stood there by the fence and placidly observed as I stopped and snapped his photo. He even turned to look at me so I could get a nice face shot. He was proud and handsome--and why not? Just look at those horns! I've seen a lot of Texas longhorns since we've lived in Texas, but I think this guy has an award winning rack, even amongst his bovine peers! They are at least six feet across tip-to-tip! And look at that hide, too. This guy is definitely a contender for the cattle equivalent of a Mr. Universe contest.
But, I was really glad there was a barbed wire fence between us, just in case he decided I was annoying him.
Monday, May 14, 2012
Words to live by...

It really isn't crooked, it's my lame photography...
Sometimes I see something I really like and want to duplicate it, only with my special twist on it. This is one of those projects. I've come across a lot of quotes and scriptures that I'd like to have as visible reminders, but I don't want them all over the house, mixed in with other art. I finally found an idea I liked and got started. I'm really happy with the results, even if it did take a lot more time than I had originally anticipated. I chose my quotes and scriptures, then decided how large I wanted each one. I used 1" x 5", 1" x 8", 1" x 10", and 1" x 12" boards. I painted most of them black and a few of them antique white for contrast. Of course the lettering took a while. I like the hand painted look for most things, so I did almost all of it by hand, rather than using vinyl lettering. Vinyl is great for some things, but I didn't want these to look manufactured, I wanted a less than perfect appearance. The white boards have the lettering applied using the Mod Podge reverse transfer technique (tutorial here: http://matsutakeblog.blogspot.com/2009/10/how-to-transfer-inkjet-images-to-wood.html), rather than hand lettering, but all the black ones are painted. I love that it covers a large space on a large wall (approx 45" x 45"), but it also adds a nice graphic touch that doesn't look too shabby or too impersonal. Now what can I paint next?
Wednesday, April 25, 2012
Manners Matter!

Wednesday, April 4, 2012
Easter GreetingsTag Freebie

Tuesday, April 3, 2012
Mmmm....

Ingredients:
6 medium potatoes, peeled and diced into 3/4-1" cubes
6 eggs, whisked with:
1 tsp. garlic granules (or 1 clove crushed fresh garlic)
2 tsp. dried parsley (or 1 Tblsp. fresh parsley, minced)
1 tsp. salt
 Heat about 1/4" of oil over medium heat in a non-stick skillet. Add potato cubes and cook, turning frequently, until crisp and brown on all sides. When potatoes are done, drain oil and sprinkle with salt. Pour beaten egg mixture over potatoes and swirl pan to make sure the egg covers the bottom of the pan. When the egg has puffed up around the potato pieces and is done on the bottom, cover the pan with a large plate (or I use a pizza pan) and invert the mixture onto the plate. Slip the tortilla off of the plate, back into the skillet, keeping the browned side up. Cook for a few more minutes, until egg has cooked all the way through. Slide tortilla onto a serving plate and cut into wedges or squares. Serve with steamed veggies and salad. My family likes to top it with salsa, but I was instructed by the Spanish friend who taught me to make this that is is to be served plain. I won't tell if you don't....
Friday, March 30, 2012
Nom, nom, nomvana

If you want to share just one, not a whole plate, here's an easy delivery method:
 |
| A clear plastic cup+ jelly beans+ muffin dropped in a cellophane gift bag. Add a ribbon and a tag. |


Here's the recipe:
Cheese Filled Carrot Muffins
Makes about 30
Filling:
12 oz. cream cheese, softened
1/2 cup sugar
1/2 tsp. vanilla extract
1/2 tsp. orange extract
Muffins:
2 1/2 cups all-purpose flour
2 cups oat flour (or oatmeal run through the blender then measured)
3/4 cup granulated sugar
3/4 cup dark brown sugar, firmly packed
3 tsp. baking powder
1/2 tsp. baking soda
2 tsp. cinnamon
1 tsp. ground ginger
1 tsp. salt
4 large eggs
1 1/2 cups applesauce
2/3 cup vegetable oil
2 cups finely shredded carrots, lightly packed
Glaze:
1 1/2 cups powdered sugar
1 Tbls. butter, softened
2 Tbls. marmalade
1-2 Tbls. milk
Preheat oven to 400° F.
In a medium bowl, beat the cream cheese, sugar and extracts until smooth.
In a large mixing bowl, measure the dry ingredients. In a small bowl, whisk together the eggs, oil, and applesauce. Add the wet ingredients to the dry ingredients, mixing just until blended. Stir in the shredded carrots.
Prepare muffin pans by lining with paper liners. Drop about 2 tablespoons of the batter into muffin cups. Drop a tablespoon of filling on top of the batter. Drop another tablespoon of the remaining batter over the filling, making sure the filling is covered. The muffin cups will be fairly full.
Bake for 18-20 minutes or until a toothpick inserted into the cake part comes out clean.
While muffins are baking, combine glaze ingredients in a small bowl and whisk together until creamy.
Let muffins cool in pan for about 10 minutes; then transfer to a wire rack. Lightly spread or drizzle glaze over the top. (These are not cupcakes—the glaze should be just a thin layer on top.)
Saturday, March 24, 2012
Repurposed Baby Crib Necklace Tree

Friday, March 23, 2012
A Cheerful Easter

Bake a batch of carrot cake in several of these pans, frost with cream cheese frosting, top with a sweet Easter greeting. No one will be looking for hidden eggs when you show up with this delightful treat!
Use your favorite recipe (yours might be more diet-friendly), or here's mine:
Carrot Cake
3 cups shredded carrots 2 tsp. baking soda
2 cups flour 2 tsp. cinnamon
1 cup granulated sugar 1/2 tsp. ground nutmeg
1 cup brown sugar 4 eggs
2 tsp. baking powder 1 1/2 cups vegetable oil
1 tsp. salt 1 cup chopped walnuts or pecans
Preheat oven to 350 F. Grease and flour two 9-in round cake pans, one 9" x 12", or two large disposable loaf pans. In a large bowl, combine all dry ingredients for cake except nuts. In a small bowl, beat eggs and oil together. Add to dry ingredients, mixing until well blended. Fold in carrots and nuts. Pour into prepared pan(s). Place disposable pans on a cookie sheet before placing in oven. Bake layers 25-30 minutes, loaves 30-40 minutes or until toothpick inserted in center comes out clean. It may take longer if the carrots have a high moisture content, just be patient and keep checking. Cool completely, then frost.
Cream Cheese Frosting
1 (8-oz.) pkg cream cheese, softened
1/2 cup butter, softened
2 tsp. pure vanilla extract
2 cups powdered sugar
1 cup chopped walnuts or pecan, if desired
In a medium bowl, beat cream cheese and butter until fluffy. Blend in vanilla. Gradually beat in powdered sugar, beating until smooth and creamy. Fold in chopped nuts if using. Spread frosting over sides and top of cake.
I usually omit the nuts in the frosting and use a couple of tablespoons of chopped nuts for garnish, instead.
Enjoy!
Thursday, March 22, 2012
Thrifty Thursday
Today I'm starting a new theme, Thrifty Thursday. Every Thursday there will be a post with money-saving and/or up-cycling ideas to help reduce waste and save those precious bucks. Today, my project is a desktop organizer made from empty cereal boxes. Here's the finished product:

 I began with three cereal boxes. I taped them together with clear packing tape and cut the sides at an angle from the back down to the front, about 6" from the base. I didn't cut the front piece of the front box off at the 6" line, instead I scored it and folded it to the inside for added strength. I did the same for each joining of the boxes--I cut the back piece off to the height I wanted and scored and folded the front piece over the back piece and glued it to the inside. I used Tacky glue for this step. On the back piece, I folded the flap of the cereal box to the inside and glued it down for extra support across the back.
 I sprayed the outside sides with spray adhesive because I feel like it holds fabric more smoothly without seeping through between the threads than Tacky glue and glue guns leave ridges underneath which I didn't want. I laid the fabric out on the table wrong side up and placed the stack of boxes on the back side about 2" from the bottom selvage edge.This is important for a one way design like this. If the fabric didn't have a specific direction, I could have covered it more like wrapping a gift. I chose an upholstery weight toile fabric, about 1/3 yard that I had in my fabric stash left over from previous projects. If the fabric had been lighter weight, I would have sprayed the outsides of the boxes with a coat of light spray paint to cover the printing, but the heavier fabric covers the print on the boxes well. I decided to place the seam on the side so it would be less obvious than down the center of the back or front. Wrap the fabric around the boxes, leaving about 1 1/2" overlap. Using Beacon Adhesive's Fabri-Fix, I turned under about 1/2" of the overlapping edge and glued it down over the bottom piece of fabric.


As a finishing touch, I cut pieces of fabric the width of the box plus 1", turned the side edges under about 1/2" and glued them over the two center dividers. The fabric doesn't need to go all the way to the bottom of the box inside, just far enough to keep the fiberboard hidden from view. Finally, I wrapped a piece of taffeta ribbon around the box, leaving the end at the front. I cut it into a V shape and glued a decorative button on the top. Instructions for making the decorative buttons are here http://snippetsnbits.blogspot.com/2011/07/handmade-decorative-brads.html. This one is done without the brad inside, but the process is the same, otherwise.
I now have a no (new) cost organizer for my desk to keep my loose papers organized that is also attractive. Win-win as far as I'm concerned.

 I began with three cereal boxes. I taped them together with clear packing tape and cut the sides at an angle from the back down to the front, about 6" from the base. I didn't cut the front piece of the front box off at the 6" line, instead I scored it and folded it to the inside for added strength. I did the same for each joining of the boxes--I cut the back piece off to the height I wanted and scored and folded the front piece over the back piece and glued it to the inside. I used Tacky glue for this step. On the back piece, I folded the flap of the cereal box to the inside and glued it down for extra support across the back.


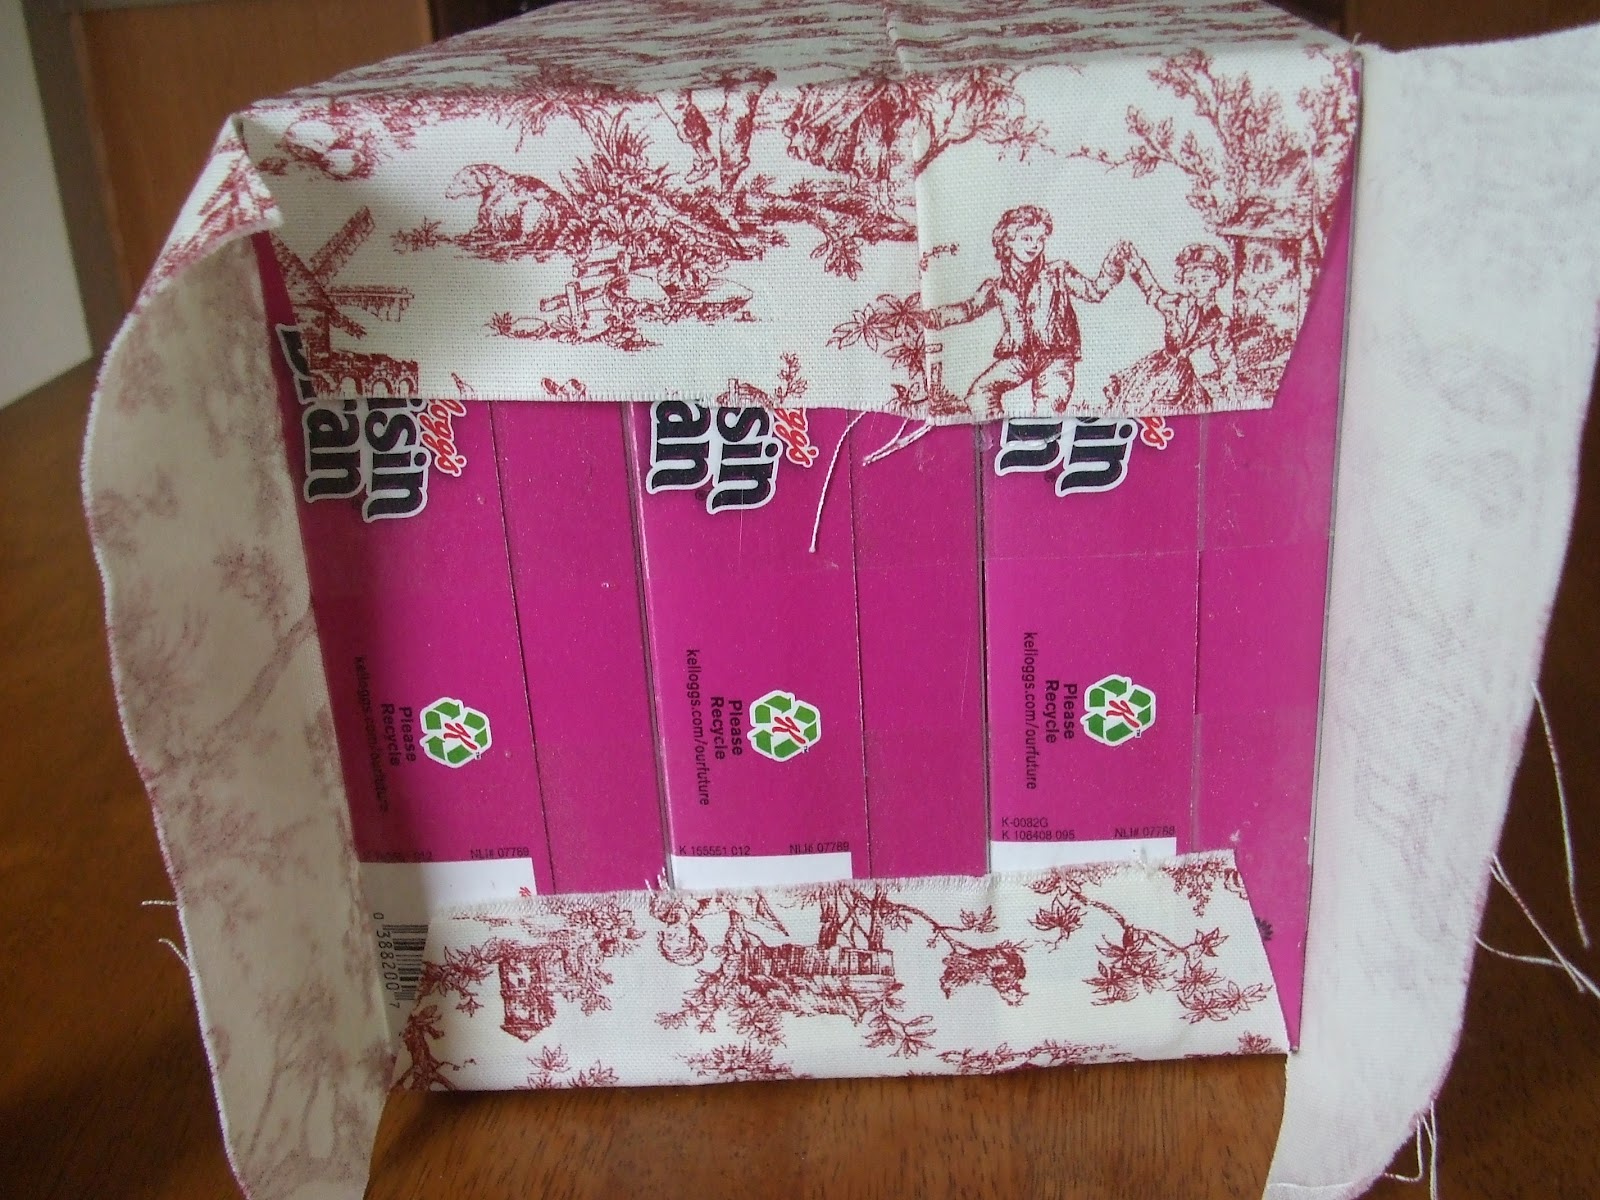
I cut the bottom overhang at an angle from the inside to the corner on the two sides and glued them down, keeping the fabric nice and smooth. Then I folded the other two sides in at an angle and glued them over the top. On the sides, I snipped the fabric straight in at the point where the boxes are joined, then cut each section at an angle to fit in place smoothly. The front and back were easy. I just cut from the outside edge to the corner, turned under the edges to make a slight angle and glued them down inside the box. I didn't cover the bottom of the box after turning in the ends, but if it bothers you, you can cover it with a piece of fabric or felt.


I now have a no (new) cost organizer for my desk to keep my loose papers organized that is also attractive. Win-win as far as I'm concerned.
Wednesday, March 21, 2012
Running rabbits!

Around our house, bunnies have always been the favored pet. I don't really know why. They really aren't as much entertainment as a dog or cat (or as companionable), but they are soft, sweet, and quiet. Spring always seems to be the best time for bunny themed decor, so when I came across this image as I was trying to come up with some fresh ideas for simple accents for the house that would last for the next few months, this filled the bill.
The best part--no expense! The image came from The Graphics Fairy, http://graphicsfairy.blogspot.com/2012/02/vintage-clip-art-bunny-silhouette.html. If you haven't come across this site, it's wonderful! A warning though, you may have a hard time tearing yourself away once you start looking. The image is also available as a free printable page with 8 oval images (4 large/4 small) of vintage sheet music backgrounds with the rabbit centered on each here: http://www.graphicsfairy-crafts.com/2012/03/crafty-tutorial-make-vintage-german.html.
Think of the possibilities, bunny lovers!
I printed the rabbit on a sheet of scrapbook paper designed to look like an old mail-order catalog. I applied it to an oval of foam core board and glued a ruffle of stained coffee filters around the outside edge of the underside. A quick inking around the edge of the image, a layer of glitter on top of that, and attach a length of satin ribbon looped for hanging to the back and it's done. I had everything on hand., so it didn't cost a cent, even the ribbon. It had come wrapped around some blankets I picked up for the kids a couple of years ago. I couldn't bear to throw it out (it's about 1 1/2" wide, double sided satin), so I rolled it up, dropped it in a compartment of my organizer/tote and now I have a use for it, hurray for up-cycling!
Friday, March 16, 2012
More St. Patrick's Festivities


Here are a few recipes to get your Irish on...
Prepare the soup ahead of time, pour into a quart sized canning jar, cut a circle of green fabric or decorative paper, and place over the top of the jar. Wrap a rubber band around the top and tie a ribbon over the top of it to cover it. Attach a tag to let the recipient know what kind of soup it is and how to serve it. You may want to include a container of cream and some chives for garnishment.
I mix the dry ingredients together, place in a plastic bag and attach a label with wet ingredient requirements and preparation instructions. This allows them to make the bread fresh to serve with the soup. You can also make the bread ahead of time, and give the loaf as part of the gift.
I've included a bottle of sparkling apple cider, and some Mint-Truffle Brownies in my tote. Yum!
Leek and Potato Soup
2 lb. potatoes, peeled and cubed
1 lb. leeks, sliced
1 onion, chopped
1 celery stalk, sliced
5 cups homemade or canned chicken broth
2 1/2 cups milk
1/4 cup butter
1 bay leaf
2 Tbls. parsley, minced
Salt and pepper to taste
1/2 cup cream
Fresh chives, chopped
Melt the butter in a large saucepan over medium heat. Add leeks, onions, and celery and sauté until tender. Add chicken broth, 1/2 cup milk, potatoes, bay leaf, parsley, salt and pepper. Bring to a boil, then reduce heat to low, cover and cook until potatoes are tender, about 25 minutes. Remove the bay leaf and discard. Let soup cool for about 10 minutes, then puree in a blender or food processor. Return puree to pan. Add remaining milk. Thoroughly heat over medium heat. Ladle into bowls. Spoon a tablespoonful of cream over the top and sprinkle with the chives.
Irish Soda Bread
4 cups flour
1/4 cup sugar
1 tsp. baking soda
2 tsp. baking powder
1 tsp. salt
2 eggs
1 1/4 cups buttermilk
1/4 oil
2 tsp. caraway seeds
1 cup raisins
1 Tbls. milk
Preheat oven to 350° F. Lightly grease a baking sheet. In a large bowl, stir the flour, baking soda, baking powder, and salt together. In a separate bowl beat the eggs, buttermilk, and oil together. Make a well in the center of the dry ingredients and pour in the buttermilk mixture. Add the caraway seeds and raisins. Stir until soft dough has formed. Shape the dough into a large ball on a lightly floured board. Place on the prepared baking sheet, cut a cross on the top of the dough with a sharp knife. Brush with the milk. Bake until golden brown, 35-40 minutes.
Mint Truffle Brownies
Brownie Base
1 box (1 lb 2.4 oz) Betty Crocker® Original Supreme Premium brownie mix
Water, vegetable oil and egg called for on brownie mix box
Filling
2 1/2 cups powdered sugar
3 tablespoons butter or margarine, softened
3 tablespoons whipping cream
2 oz cream cheese, softened
1/8 to 1/4 teaspoon mint extract
2 drops green food color
Topping
1/3 cup whipping cream
1 1/3 cups (8 oz) semisweet chocolate chips
1/3 cup butter (do not use margarine)
- Heat oven to 350°F (325°F for dark or nonstick pan). Grease bottom only of 9-inch square pan with shortening or cooking spray. (For easier cutting, line pan with foil, then grease foil on bottom only of pan.) Make and bake brownie mix as directed on box. Cool completely, about 1 1/2 hours.
- In large bowl, beat filling ingredients with electric mixer on medium speed until smooth. Spread over cooled brownies. Refrigerate about 1 hour or until set.
- Meanwhile, in 2-quart nonstick saucepan, heat topping ingredients over medium-low heat, stirring constantly, until melted and smooth. Cool about 10 minutes or until lukewarm.
- Pour topping over filling; spread to cover. Refrigerate uncovered about 2 hours or until set. Before cutting into bars, let stand 10 minutes at room temperature. For bars, cut into 5 rows by 4 rows. Store covered in refrigerator.
Makes 20 brownies
Subscribe to:
Posts (Atom)


